Apple launches Apple Store app in India

The Apple Store app provides customers with the most personalized way to shop for Apple’s innovative lineup of products and services. Learn more >

You can make a difference in the Apple Support Community!

When you sign up with your Apple Account, you can provide valuable feedback to other community members by upvoting helpful replies and User Tips.

Looks like no one’s replied in a while. To start the conversation again, simply ask a new question.

How to show songs I've purchased in iTunes from songs I've downloaded from CDs

Is there any way to add a header to my music Library to show whether songs have been purchased through iTunes or downloaded from CDs. It would be helpful for iTunes to make a column header which would allow a user to sort by purchased or downloaded. Currently, the only way to find if a song has been purchased or downloaded is by clicking individual songs. With over 8,000 songs in a Library this would take a tremendous amount of time and effort.


Posted on Mar 6, 2022 10:40 AM

Reply
Question marked as Top-ranking reply

Posted on Mar 6, 2022 12:04 PM

Yes there is. In fact, there are at least two methods.


Method 1 - sorted by "Purchased Date" & not purchased date (read on, it really does do what you want):


  • In the Songs view, right-click on the column header-bar to reveal the context menu:
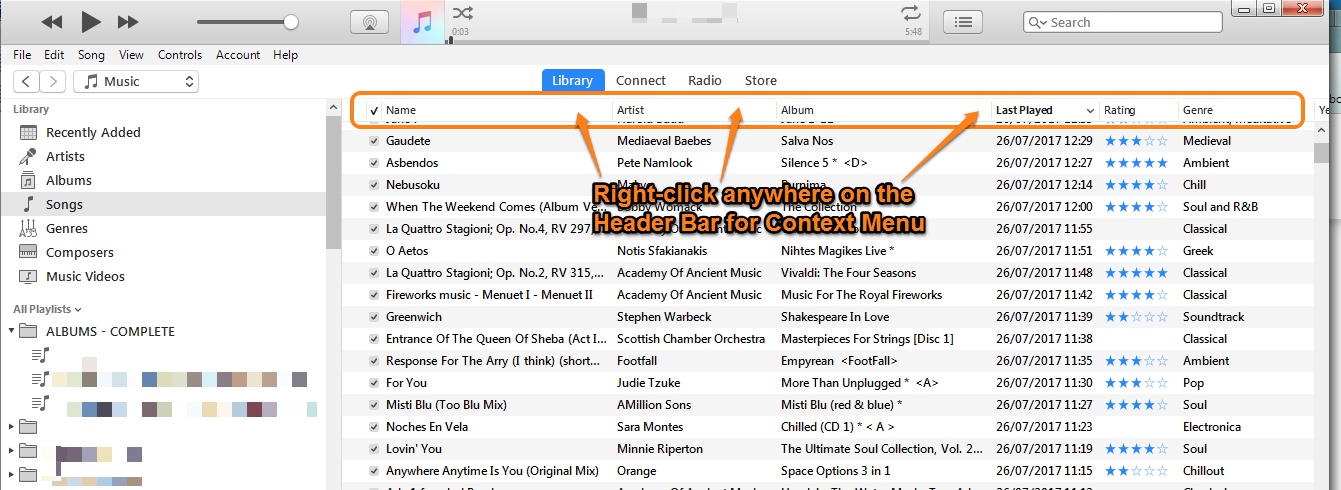

  • select Purchase Date from the pop up list. This will add the Purchase Date column to your display
  • click on the Purchase Date header itself to sort the songs by that column. Click it again to reverse the order of the list
  • all songs purchased from the iTunes Store will have a purchase date, while songs copied from your CDs will not. All songs with a purchase date (i.e. from the iTunes Store) will be at one end (or the other) of the list


Method 2 - create Smart Playlists:

This method separates the two types of songs (iTunes Store and everything else) completely, into playlists. You do not have to use these playlist for anything other than the specific task that you have in mind and you can leave them permanently configured as it does not affect anything else that you currently do.


Part One:

    • Click on File/New/Smart Playlist. A panel like the one below pops up:
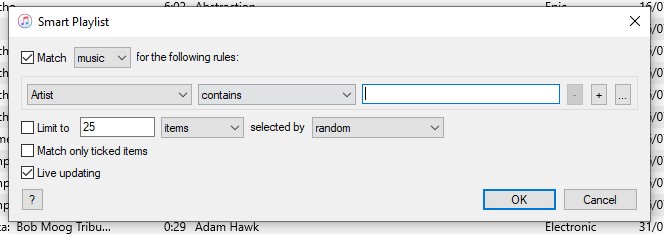

    • change Artist (drop down menu) to Purchased. (This will change the second box to is true). You do not need to change any of the other boxes, so resist the temptation. Your panel will now look like the one shown below:
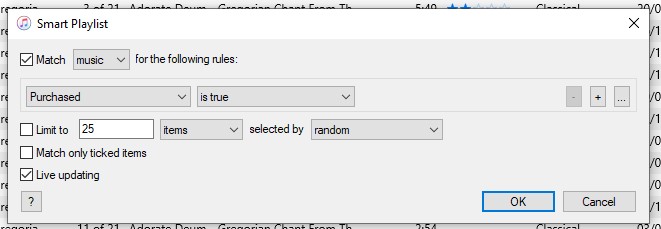

    • click the OK button. Your Playlist will be named as Playlist x (where x is the next available number) and be highlighted in blue. While it is blue, rename it as you prefer. If you miss the opportunity, simply double click the playlist name until it's highlighted in black and type in your preferred name (i.e. iTunes Purchases)


Part two:

Here's the best bit; in addition to creating the Smart Playlist above, which shows only your iTunes Store purchases), how about creating a Playlist that shows everything else, except those iTunes Store purchases?


    • Click on File/New/Smart Playlist. The same create panel appears, as it did before
    • change Artist (drop down menu) to Purchased. (This will change the second box to is true)
    • change is true (drop down menu again) to is false. (As above, do not change any of the other boxes (because you don't need to). Your panel will look like the one shown below:
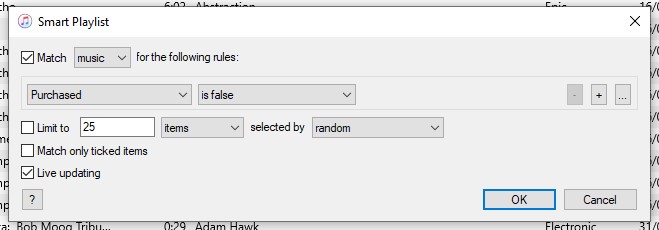

    • click the OK button. As before, you have the option to rename the playlist, so how about non-Apple purchases?
    • this Smart Playlist contains any song without a purchased date, so excludes the iTunes Store purchases, but includes copies of CDs, downloads and purchases from other online stores


Job done.


However - suppose you want to have a list of songs purchased from Amazon? Easy! (well, it is in the UK, so I assume it will be the same elsewhere). Songs purchased from the Amazon store have an "Amazon Song ID number" in the comments section of a song's file. So if you create a Smart Playlist that looks for the word "Amazon" in the comments field, it will create a playlist of only songs purchased from Amazon (unless you're really unlucky and you have non-Amazon songs with the word in the comments field).

      • File/New Smart Playlist
      • change Artist to Comments
      • leave the second box as contains
      • type the text Amazon into the empty box on that line
      • leave all other options as they are
      • click the OK button
      • rename the playlist to your preferred choice
      • that's it


If you have songs from other sources, but without an easily identifiable key to them, you will just have to find those individually. You could add your own comment in the comments box and then create a Smart Playlist to look for that word if you wish.

1 reply
Question marked as Top-ranking reply

Mar 6, 2022 12:04 PM in response to kandpmcc

Yes there is. In fact, there are at least two methods.


Method 1 - sorted by "Purchased Date" & not purchased date (read on, it really does do what you want):


  • In the Songs view, right-click on the column header-bar to reveal the context menu:


  • select Purchase Date from the pop up list. This will add the Purchase Date column to your display
  • click on the Purchase Date header itself to sort the songs by that column. Click it again to reverse the order of the list
  • all songs purchased from the iTunes Store will have a purchase date, while songs copied from your CDs will not. All songs with a purchase date (i.e. from the iTunes Store) will be at one end (or the other) of the list


Method 2 - create Smart Playlists:

This method separates the two types of songs (iTunes Store and everything else) completely, into playlists. You do not have to use these playlist for anything other than the specific task that you have in mind and you can leave them permanently configured as it does not affect anything else that you currently do.


Part One:

    • Click on File/New/Smart Playlist. A panel like the one below pops up:


    • change Artist (drop down menu) to Purchased. (This will change the second box to is true). You do not need to change any of the other boxes, so resist the temptation. Your panel will now look like the one shown below:


    • click the OK button. Your Playlist will be named as Playlist x (where x is the next available number) and be highlighted in blue. While it is blue, rename it as you prefer. If you miss the opportunity, simply double click the playlist name until it's highlighted in black and type in your preferred name (i.e. iTunes Purchases)


Part two:

Here's the best bit; in addition to creating the Smart Playlist above, which shows only your iTunes Store purchases), how about creating a Playlist that shows everything else, except those iTunes Store purchases?


    • Click on File/New/Smart Playlist. The same create panel appears, as it did before
    • change Artist (drop down menu) to Purchased. (This will change the second box to is true)
    • change is true (drop down menu again) to is false. (As above, do not change any of the other boxes (because you don't need to). Your panel will look like the one shown below:


    • click the OK button. As before, you have the option to rename the playlist, so how about non-Apple purchases?
    • this Smart Playlist contains any song without a purchased date, so excludes the iTunes Store purchases, but includes copies of CDs, downloads and purchases from other online stores


Job done.


However - suppose you want to have a list of songs purchased from Amazon? Easy! (well, it is in the UK, so I assume it will be the same elsewhere). Songs purchased from the Amazon store have an "Amazon Song ID number" in the comments section of a song's file. So if you create a Smart Playlist that looks for the word "Amazon" in the comments field, it will create a playlist of only songs purchased from Amazon (unless you're really unlucky and you have non-Amazon songs with the word in the comments field).

      • File/New Smart Playlist
      • change Artist to Comments
      • leave the second box as contains
      • type the text Amazon into the empty box on that line
      • leave all other options as they are
      • click the OK button
      • rename the playlist to your preferred choice
      • that's it


If you have songs from other sources, but without an easily identifiable key to them, you will just have to find those individually. You could add your own comment in the comments box and then create a Smart Playlist to look for that word if you wish.

How to show songs I've purchased in iTunes from songs I've downloaded from CDs

Welcome to Apple Support Community
A forum where Apple customers help each other with their products. Get started with your Apple Account.